The procedures in this topic describe the initial steps needed to create a new FITs Quote/Booking.
A booking can be entered as a quotation or as a confirmed live booking. This User Manual assumes that a Quotation booking status is selected and follows a procedure to convert the quotation into a booking.
For more information on booking status selection please see About the Create Booking Fields.
Create an FIT Booking - Insert New Booking
-
From the Home menu, select
 Home > Bookings and Quotes > FITs.
- Click the Home hamburger menu to open it:

- Click the Bookings and Quotes menu option to expand it:

- Click FITs to open the FITs screen:

- Click the Home hamburger menu to open it:
-
ClickInsert New Booking.

-
On the emptyCreate Booking screen, give this booking a name and enter data into other fields as required. Refer to About the Create Booking Fields for more information on the data you can enter.
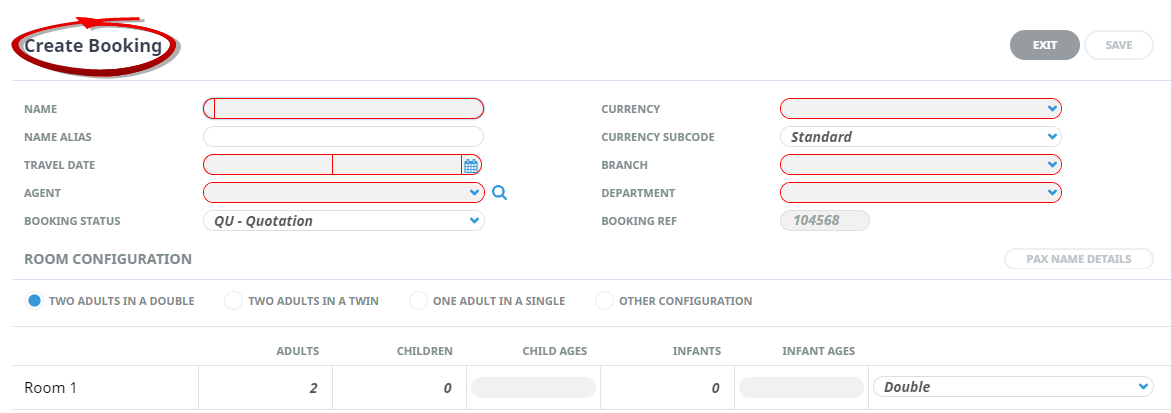
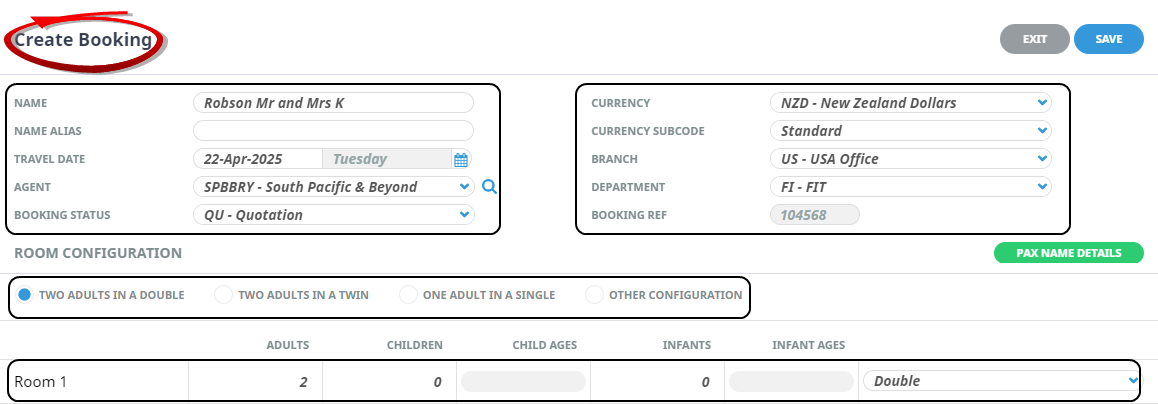
NOTE: This particular example is a booking for one couple, needing one room, if additional pax are travelling additional room selection can occur here, or during a service line insert. Room configurations for pax travelling can be complex; the solution is to use the 'Other Configuration' this allows you to enter multiple rooms, topic Set Room Configurations describes scenarios, rules and procedures for handling alternative room configurations.
-
Do not click Save just yet - continue with procedure Enter Pax Details.
NOTE: If additional pax names are not known, the information can be inserted at a later date using the Pax Travelling menu.
-
ClickSave to keep the changes.

-
ClickExit to discard any changes.

-
If you click Save, the FIT Booking is created and theService Line Insert screen is displayed.
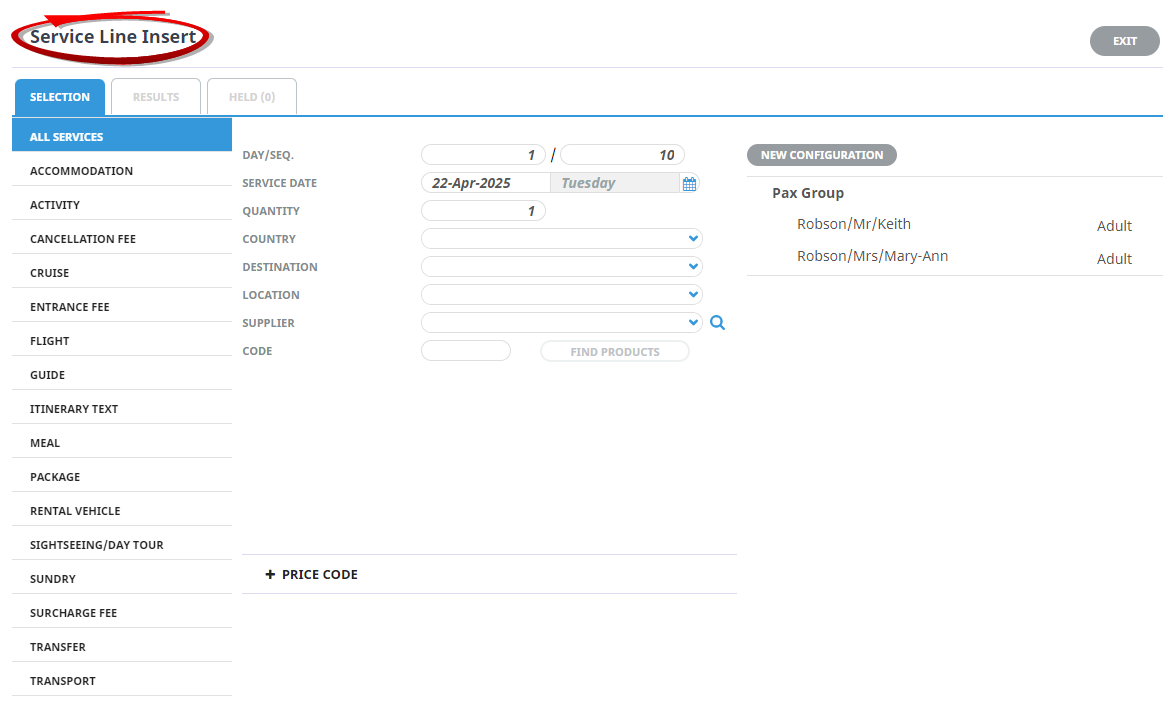
In this case, click the grey New Configuration button and continue with procedure Setup a Configuration During Service Insert.


About the Create Booking Fields
![]()
Name
FITs has names at two levels. The top level is the Booking Name and this is used as the prime retrieval field when locating bookings. At the second level, within the booking, are passenger names assigned to Room 1, Room 2 etc.

NOTE: Booking Names are mandatory; Pax Names are optional.
Name Alias
The Name Alias field is an alternative name field to display a different name for the booking. Some Tourplan users may choose to use this field for messaging displaying an alternative language booking name.
Travel Date/Day
This is normally the date of the first service being provided. Some Tourplan user companies use different dates; e.g. date of departure from home country. If any date other than date of first service is to be used as the travel date, it is a decision taken by each user company.
Agent
This is the travel agent/wholesaler/end user etc that is making and paying for the booking. Select the agent from the drop-down list. Entering the first few characters of the agent code and clicking the drop-down will search from that point forward in the drop down list. If the agent is not listed, it will have to be created in the Debtors application.
NOTE: Clicking the Search button next to the agent name field will open a dialogue allowing a search on agent name etc.
NOTE: Dependant on system settings, a warning may display advising that the agent's credit limit is exceeded. Again, dependant on the settings, entry of the booking could be denied. These settings are user company specific.
Booking Status
The default initial booking status is displayed. This is defaulted from the Tourplan INI file and may be changed if required. This is determined by each user company’s procedures.
NOTE: This is the status of the Booking, and does not relate to the status of individual services. The Booking Status determines what actions can be taken with the booking; i.e. whether vouchers can be issued or invoices raised, allocations taken etc. The configuration of booking statuses in Code Setup determines the permit-able actions of each status.
Quotation: If a quotation status is selected Convert Quote, and Cancel Quote buttons will display and booking statuses are limited to other quotation statuses.
NOTE: Once the booking is converted to a live booking a full list of booking statuses will be available.
Confirmed: If a confirmed status is selected the booking assumes full booking workflow functionality, allowing users to request services, confirm services, take from allocation, process accounts transactions in a live booking.
Currency
The agent’s default sell currency, as set up in the Debtors application, is displayed. The currency may be changed for this booking by selecting an alternative currency from the drop-down list. Refer to the currency examples below.
NOTE: Only currencies which have been attached to the agent in Debtors will display in the drop down list.
NOTE: Currency rates between the Agent currency selected and the system currency (normally the currency of the country the system is domiciled in) must first be entered in the system currency exchange rate table.
Currency Subcode
If the Agent has a Currency Subcode attached to it, it will display here. It determines which (if any) of multiple exchange rates between the same currency pairs that is to be used. If the Subcode field is blank, it can be left blank, in which case the default currency rate will be used.
Branch
The default code is displayed if set up in the User’s settings. Otherwise, select the branch code for this booking from the drop-down list or by typing the code.
NOTE: The ‘Branch’ is used as the first two characters of the booking reference and can have a bearing on revenue and expense postings in the financials.
Department
The default code is displayed if set up in the User’s settings. Otherwise, select the department code for this booking from the drop-down list or by typing the code.
NOTE: The ‘Department’ is used as the second two characters of the booking reference and can also have a bearing on revenue and expense postings in the financials.
Reference
The system automatically creates a 6-digit reference number for this booking. The reference number is appended to the Branch and Department codes to form the full Booking Reference. The default value in this field cannot be changed.